Invoking the screen
To go to the Search Expediting Status Display screen click Purchase Order on the main menu and select the Expediting Status Display option.
Main Menu > Purchase Order > Expediting Status Display
Screen layout
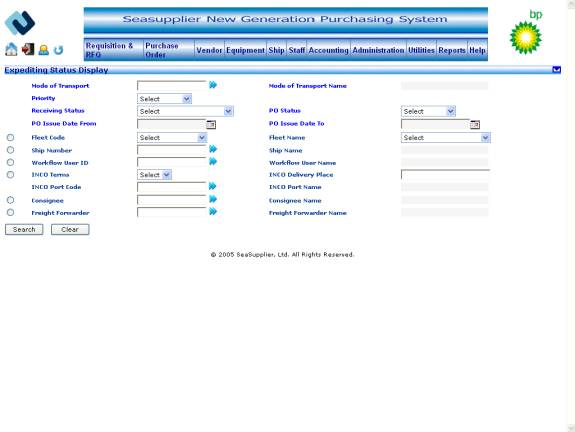
Figure Expediting Status Display 01
Select criteria to search for the relevant PO
The Expediting Status Display screen allows you to search for the relevant PO and view its detail on the basis of any of the criteria listed against an option button to the left of the screen. These have been described below in detail.
Enter the following fields before going on to select a specific search criterion to search and then view expediting status details of the searched PO.
To search by Mode of Transport
Click the button to the right of the textbox to access the Mode of Transport popup from where you can select the relevant mode of transport or enter a value in the textbox. The maximum length allowed for the field is 8. Click the Search button at the bottom of the screen. You will fetch the selected PO’s summary scan in the information grid at the bottom of the screen. You may have to scroll to view.
|
Related Field Mode of Transport Name label This indicates the corresponding mode of transport name for the mode of transport chosen in the earlier step. This value gets populated at the time of selecting mode of transport from the Mode of Transport popup. |
Priority dropdown
Select the relevant priority from the priority dropdown.
Receiving Status dropdown
Select the relevant receiving status from the receiving status dropdown.
PO Status dropdown
Select the relevant PO status from the PO status dropdown.
PO Issue Date From textbox
Click the calendar button to the right of the PO issue date from textbox and select the relevant date.
PO Issue Date To textbox
Click the calendar button to the right of the PO issue date to textbox and select the relevant date.
To search by Fleet Code
Select the relevant fleet code from the fleet code dropdown. The option button to the left will get selected on its own. Click the Search button at the bottom of the screen. You will fetch the selected PO’s expediting status details in the information grid at the bottom of the screen. You may have to scroll to view.
|
Related Fields Fleet Name textbox This indicates the name of the fleet. It gets populated with the corresponding fleet name if you have chosen a fleet code from the fleet code dropdown above. If fleet name is selected then the fleet code gets populated corresponding to it. The option button to the left will get selected on its own. |
To search by Ship Number
Click the button to the right of the textbox to access the Select Ship popup from where you can select the relevant ship number or enter a value in the textbox. The option button to the left will get selected on its own. The maximum length allowed for requisition ship number is 8. Click the Search button at the bottom of the screen. You will fetch the selected PO’s expediting status details in the information grid at the bottom of the screen. You may have to scroll to view.
|
Related Fields Ship Name label This indicates the corresponding ship name for the ship number chosen in the earlier step. This value gets populated at the time of selecting ship number from the Select Ship popup. |
To search by Workflow User ID
Click the button to the right of the textbox to access the Workflow User popup from where you can select the relevant workflow user id or enter a value in the textbox. The option button to the left will get selected on its own. The maximum length allowed for the field is 10. Click the Search button at the bottom of the screen. You will fetch the selected PO’s expediting status details in the information grid at the bottom of the screen. You may have to scroll to view.
|
Related Field Workflow User Name label This indicates the corresponding workflow user name for the workflow user id chosen in the earlier step. This value gets populated at the time of selecting workflow user id from the Workflow User popup. |
To search by INCO Terms
INCO Terms dropdown
Select the relevant value from the INCO terms dropdown. The option button to the left will get selected on its own. Click the Search button at the bottom of the screen. You will fetch the selected PO’s expediting status details in the information grid at the bottom of the screen. You may have to scroll to view.
INCO Delivery Place textbox
Enter the value in the INCO delivery place textbox. The maximum length allowed for the field is 30. Click the Search button at the bottom of the screen. You will fetch the selected PO’s expediting status details in the information grid at the bottom of the screen. You may have to scroll to view.
INCO Port Code textbox
Click the button to the right of the textbox to access the Select Port popup from where you can select the relevant port code or enter a value in the textbox. The option button to the left will get selected on its own. The maximum length allowed for the field is 5.
Click the Search button at the bottom of the screen. You will fetch the selected PO’s expediting status details in the information grid at the bottom of the screen. You may have to scroll to view.
|
Related Fields INCO Port Name label This indicates the corresponding INCO port name for the INCO port code chosen in the earlier step. This value gets populated at the time of selecting INCO port code from the INCO Port popup. |
To search by Consignee
Click the button to the right of the textbox to access the Consignee popup from where you can select the relevant consignee or enter a value in the textbox. The option button to the left will get selected on its own. The maximum length allowed for the field is 9.
Click the Search button at the bottom of the screen. You will fetch the selected PO’s expediting status details in the information grid at the bottom of the screen. You may have to scroll to view.
|
Related Field Consignee Name label This indicates the corresponding consignee name for the consignee chosen in the earlier step. This value gets populated at the time of selecting consignee from the Consignee popup. |
To search by Freight Forwarder
Click the button to the right of the textbox to access the Freight Forwarder popup from where you can select the relevant freight forwarder or enter a value in the textbox. The option button to the left will get selected on its own. The maximum length allowed for the field is 9. Click the Search button at the bottom of the screen. You will fetch the selected PO’s expediting status details in the information grid at the bottom of the screen. You may have to scroll to view.
|
Related Field Freight Forwarder Name label This indicates the corresponding freight forwarder name for the freight forwarder id chosen in the earlier step. This value gets populated at the time of selecting freight forwarder id from the Freight Forwarder popup. |
To clear the Expediting Status Display screen
Click the Clear button at the bottom to clear the screen. You can now enter a new set of criteria to search by.
Understanding the Expediting Status Display details that is fetched by the above method
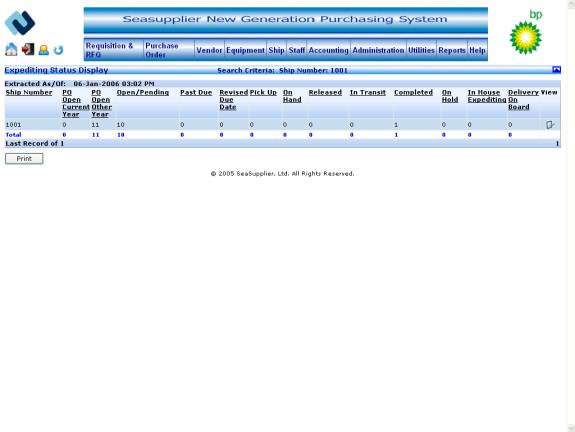
The expediting status display search option fetches various expediting details, which are displayed in a data grid.
The data grid is displayed with the following details:
Ship Number
Count of POs Open for the Current Year
Count of POs Open for Other Year
Count of POs with Expediting Status as ‘Open’ or ‘Pending’
Count of POs with Expediting Status as ‘Past Due’
Count of POs with Expediting Status as ‘Revised Due Date’
Count of POs with Expediting Status as ‘Pick Up’
Count of POs with Expediting Status as ‘On Hand’
Count of POs with Expediting Status as ‘Released’
Count of POs with Expediting Status as ‘In Transit’
Count of POs with Expediting Status as ‘Completed’
Count of POs with Expediting Status as ‘On Hold’
Count of POs with Expediting Status as ‘In House Expediting’
Count of POs with Expediting Status as ‘Delivery On Board’
The last row in the grid displays the total count for each column, while the other rows in the data grid display the records pertaining to individual ship numbers.
To print Expediting Status Display details
When the expediting status display search returns some records, a Print button appears on the screen that enables the user to print the expediting details displayed in the grid.
To print details of the expediting status, the user needs to click the Print button available at the bottom of the data grid. On click of this button, a Print screen is displayed in a modal dialog window with the details in the data grid and an option to print the details or cancel and return to the search screen.
Figure Expediting Status Display 02
To view expediting status display details
In the data grid, a View button is available in the data grid against each record grouped by ship number. To view details of the expediting status, you need to click the View button in the data grid.
On click of this button, the user is taken to the Expediting Status Detail Display screen.